Showing posts with label Projects. Show all posts

Friday, September 29, 2017

Fire Pit Arbor - part 1

This firepit has been on our project list for a loooong time. Unfortunately, it is also the project that gets pushed to the bottom of the list. Every. Single. Year.

The pit itself has been functioning for years. We are, as you may know, pyros. Controlled, of course. And always safe. We've met all the fire codes, including water availability and setting a safe non-burn zone. (Check with your local fire department to find out what your local codes are.) 

Before finishing the placement of the flagstone patio, we needed to set the posts for the arbor. In case you're wondering, digging 3' deep holes in clay/rock soil is not for the faint of heart! I ended up digging 5 holes total.  

 With the help of a couple of the kiddos, we set the five posts.  Gratefully there was no wind, so setting them plum was fairly easy.

Next came construction of the roof structure. It's almost 10' high, so I'm glad we had a 12' A-frame ladder or we'd have been in a tough spot. I made sure to stain every board BEFORE installation. This is not a required step, but highly recommended. 
Now that the arbor structure is done, we will reconvene in the spring. I will be building (or buying) a swing or two to hang from the arbor and finishing up the flagstone. And then, after years of being kicked to the bottom of the to-do list, our fire-pit will be done! :)  


Wednesday, March 1, 2017

Coffering the Kitchen


Coffered ceilings match the cabinets and provide balance throughout the space. 

The trend right now is to paint everything white. While I like white, I don't believe it is always the answer. Case in point: My kitchen. 

I love the light and bright trends in paint and decor right now and was uber excited to brighten up my kitchen with a nice new shade of griege on the walls. But, the new color created an imbalance in the space. Namely, the dark cabinets anchored the right side of room but there was no weight on the left half.  

Separately, the two halves looked great, but as a whole, they weren't communicating with each other.

The solution: Add warm wood tones to the ceiling.  


The biggest challenge - other than the up and down on the ladder - was figuring out how to space the "beams." It had to be balanced with the pantry, the wood hood, and the canned lights (because I really didn't want to have to move any electrical.) 
Total cost: $450
Total time: 4 days 
Small project - Big impact

Just getting started... 
Almost done. Last step = add a white crown molding 

Completed project. 


Tuesday, January 31, 2017

Trimming out the windows

 This week's project: Paint the living room and TRIM OUT THE WINDOW. 

Why? Because trim work is my favorite! My goal is to trim every window in my house... which, because we have a lot of big windows, is a LOT of trim :) 


There are a lot of styles in which you could trim out a window. Mine is a Cambridge/Craftsman hybrid with an 8" top casing and a 1/4" fillet.  (The lighting in this room is tough for picts, so I attached a picture from online below to give you an idea what it looks like.) 


Total cost: About $30 (not including the paint and caulk which I already had)
Total time: a few hours 
Total impact: Huge! This is a simple way to add architectural impact to your home. 


Thursday, November 10, 2016

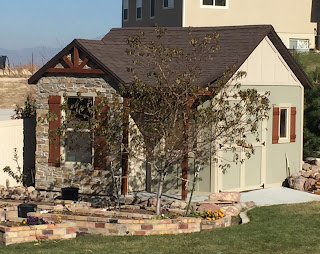
The Garden Cottage (aka: shed, aka: the project that stretched my limits!)

Hallelujah! - That's what the real name of this project should be. Instead of the "Garden Cottage," I think I should rename this baby "The Hallelujah Cottage." - Why? Because after 5 months of construction (lets be honest this should've taken 1/4 of that!), halle-freakin-lujah, we are DONE!

It started with a pile of lumber on Mother's Day. Yes, my hubby and kids are that awesome! They knew that this project had been scratching to come to life for a loooong time. A standard shed would've been easier, I'm sure, but I wanted something more than a cedar paneled box in my yard. I have to look at this thing every single day... so it had to be cute. So, yes, it has a porch... and shutters, and even a stone elevation. And we won't mention the turquoise potting bench or antique farming equipment that adorn the inside. Because, yes, a shed can be cute and functional and AWESOME!  

And, after a full season of construction, countless trips to the hardware/lumber store, almost 1500 framing nails, hundreds of hours, and a few breakdowns, it finally reached completion just before Halloween. 

Now to be fair, I kind of just picked at this project in between all of our summer adventures. And to be more fair, this was definitely not an "I" project but a "we" one. To say that I learned my limits is an understatement. But the growth and development within myself was almost as needed as the shed itself. 

Ryan and the kids were troopers. I'm sure I'm the only one who bounced out of bed early each Saturday morning with the words, "Yay, we get to work on the shed today!" racing through my mind. But they did it and they did it well. And I am soooo happy with the end product.

So here it is, the stamp of completion on the biggest, most complex construction project I've ever tackled without the help of contractors. And its GOOD! I love it!!! Hallelujah!

...now what????


Friday, September 23, 2016

Keeper of the Plains - Inspiration for a new story

A couple of years ago I visited the "Keeper of the Plains Plaza" in Wichita. The power in that place was so real it stayed with me for days and ultimately inspired me to write one of the most beautiful chapters I've ever imagined. Desperately wanting to share a piece of my experience with my readers, I tried to "force" the scene into a couple different projects. It didn't work. It needed a home of its own... and now, after stewing for a bit, I think I've found it! - I don't know how long it will take to finish this book (it's got a few other projects in front of it), but at least it has a home now...and it's a beautiful one!


Saturday, June 11, 2016

The Secret of Secrets novella series - From Concept to BEST SELLER!!


In the fall of 2014 I attended a writing retreat in the mountains above Heber, Utah. I did a bunch of writing, made some great new friends, and took advantage of the opportunity to learn from others. Near the end of the conference, mention was made of a new anthology endeavor that was on the horizon.  


At first I didn't think much of it. The idea of writing a novelette (a story about 1/3 the length of a typical novel) didn't really appeal to me. I tend to be a wordy writer - often having to edit out a serious amount of text from a typical manuscript to get it to an acceptable novel length. But I stewed on the idea. Could I do it? Would it be fun? Was it worth a try? 

In the following days I went on a road trip where I introduced the idea to my hubby. Not knowing how serious to take it, we brainstormed some ideas. By the time we reached our destination we'd brainstormed a pretty decent outline for a story about an awkward, computer geek girl, with a seemingly boring job with the NSA. 

After returning home from our trip, I pulled out my laptop and started writing. Before long Samantha Perry came to life. Within weeks I had written my complete novelette, HACKED. It was soon after accepted for publication by the Sweet and Sassy Anthology group for their "Secret Identities Collection".

But there was a hitch. There was more to Sam's story. And so, I kept writing. 

As it turns out, writing within the guidelines of a shorter format was a great exercise for me. I needed to do this project more than I ever imagined. Not only did I love exploring Samantha's introverted, awkward, sassy character, but I learned so much about telling a story without a bazillion unnecessary words. I saw measurable improvement in my craft... and I fell in love with Samantha, the man she knew as Seth, the idea of halibut fishing (read the series and you'll understand), and some beautiful parts of the United States. 

HACKED proceeded HUNTED, then shortly afterward HOOKED came to fruition. And all three books are now available on kindle and in paperback. They are short and sweet and sooooo much fun. 

And the best part? Within days of its release, HACKED hit #2 on the best seller list. HUNTED and HOOKED followed suit with their releases. Apparently readers are really liking the fast paced, quick, in-and-out of a story they can read in a day! Wow, am I ever grateful that I took the challenge and brainstormed that first story. 

To find out what the buzz is all about, visit www.stephanieworlton.com .

Tuesday, March 8, 2016

Rock It!

Fireplace after. Natural Stone. 
I have a confession to make...  

While I love writing, I find it hard to sit still for very long and would much prefer to be designing and building a project. So, I reward myself for completing my writing tasks by tackling projects around my house. (Whether they are things that actually need to be done is negotiable. Just ask my hubby. Have I ever told you how patient he is? ðŸ˜‰

Since releasing my book HUNTED almost a month ago, I've been working on a couple of things in our rec room. First I tackled the fireplace. If you remember, our rec room has been an ongoing project. About a year ago we worked on the custom built ins along side the fireplace. (Check that out here)  

I then built the coffee table. Wow, was that a fun project! I took four antique (well-weathered) apple boxes, secured them together and added industrial castors to the bottom. This is probably one of my all-time favorite projects. 

The latest project was to make the fireplace rock... as in literally, rock! And so, I rocked it!  

Fireplace before. Faux painting and slate. 
Fireplace. During construction

Next I moved on to the kitchenette. I'd initially chosen a different natural stone but when I went to pick it up, my daughter found this one. It was instant LOVE! So we switched gears. My original choice was a little more simple stone but I absolutely couldn't resist the range of beautiful colors and texture in this one. 


Kitchenette. Starting backsplash. 
Kitchenette. Backsplash complete. 


And now the basement is done (except for new paint... there's always new paint on the horizon where this girl is concerned!) 

My next project is my garden cottage (aka: shed). It's been on the docket for awhile. I'm so excited that it's finally time to start building... Of course, I have to finish some writing first, which means I may have to lock myself in my room for the next few days. Donations of Peanut M&Ms and Junior Mints would be greatly appreciated ðŸ˜‰

Wednesday, January 27, 2016

Freshening up the dining room

I've officially lived in my house for longer than I've ever lived in a house before. Like, EVER! Not just my adult life, but my entire life. I blame this fact on my itch for change. My husband disagrees. He says I just have a quarterly itch to do "something." He even suggests that in the winter, I get stir-crazy and the projects increase in frequency (*blushes* He might be right).

Whatever the reason, I've been feeling the itch - more of an ache! - to change my kitchen up a bit. Now, one might think this is an occasional process, but lets be honest, we've been in this house for 9 years and this paint job represents the 5th color in the kitchen. Judge if you must. Paint is cheep :)

After: New Greige paint on wall,
fresh paint on shelf and frames,
and a few new accessories.
Before: Paint color = Cookie Crumb 


After finishing up the paint, I decided a few new accessories were also in order. The blue rooster was a gag gift given to my hubby for Christmas, but I love it! And what do you do when you need a little piece of art work... you make it, of course. :) 
Step 1: I started with a few ceder fence slats.
I antiqued them and applied a touch of stain. 

Step 2: Designing the pattern.
I drew it first on a giant piece of paper then transferred it onto the wood. 
 Using a simple acrylic paint, I did a soft coat so the wood grain would show through. 


Friday, September 25, 2015

You know, just building furniture, and stuff ;)

This is where a take a moment to brag about my awesome daughter. Most 18 year olds would never think of picking up a saw, but mine went one step further.... she helped me design and build a whole new custom piece of furniture. Like, the real-deal kind! 

We started with some wood and ended up with the perfect entertainment center for our room. And here's the photographic evidence :) 


Thursday, October 30, 2014

That time I bit off more than I can chew

Brick work done, now just need to fill with topsoil and build the Cottage/Shed

A few months ago I made mention of a project I was getting ready to tackle. My ever patient husband had agreed to let me purchase 1000 reclaimed antique bricks for the purpose of building some new garden boxes. I promised an update on that project upon completion and - sigh, gasp, fist-pump! - it's finally done... Well, at least the brick part of it.

The truth of the matter is, this was a big project and I knew it. What I didn't know, however, was just how big it was.

It started early this spring... in a corner of our yard formerly know as the "Playground."


As tends to happen, our kids had outgrown their playset. The day we decided to let the it go, was a sad day. It'd already sat virtually untouched for a couple of years and the idea of holding on to it for the enjoyment of our (distant) future grandchildren didn't appeal to me or my husband. It was time to let someone else love and care for our awesome swingset. 

And so, we sold it.
Which left us with a big, bare spot... And even bigger ideas and plans! 

I decided to build a garden "cottage" (aka shed) where the trampoline was and move my garden boxes to the newly vacated playground area. This, of course, meant we needed to pipe water to the area.

That was one of those moments (days really) where having a large lot was NOT exciting. To get water to the new garden box area we had to trench 97 feet across our yard through sod, rocks, and the most ridiculously hard clay you can imagine. (At least we didn't have to go the whole 150ish feet across the yard. That might have been a deal breaker!)

Once the water line was run, I moved our peach tree and our apple tree to their new homes. The peach tree managed the move gloriously... the apple tree not so much.

Then, Prince Charming authorized the purchase of my BEAUTIFUL bricks. 


With the help of our children, moving roughly 5000 lbs of bricks wasn't too daunting. We stacked them along the parameter of the garden area so they'd be out of the way when I began construction.


Now, I've done a lot of handy-manish projects, but brick laying has never been one of them. I had a pretty good idea how things should go, but to solidify my ideas I attended several sessions at the University of YouTube. The masonry pros made it look easy and before long I was confident that I understood the technique.

So I got down and dirty. Literally. As it turns out, masonry isn't as easy or as clean as I thought it should be. 

I can't tell you how many hours it took to lay those darn bricks, but each and every one of them was grueling. It did't take me long to realize that trying to make PERFECT BOXES out of IMPERFECT BRICKS was a PERFECT TEST of my IMPERFECT PATIENCE. 


And, oh how I celebrated the moment I placed that last little brick! I tucked my tools in my garage with a vow that I will NEVER do masonry work again. 


We will fill these beauties up with topsoil (and a new apple tree) early next spring! Then, I get to build my cottage. And, no, it will not have bricks on it.... a covered porch, stone work, and shutters, but not a single little brick! 

Related Posts Plugin for WordPress, Blogger...